Sunday, December 20, 2015

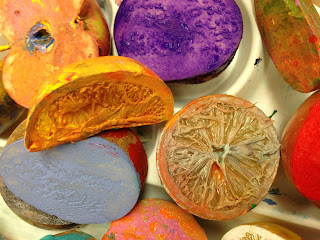
Christmas Wrapping Paper with Fruit and Veggie Stamps

Here's a fun ways to jazz up your xmas gift wrapping.  Make your own wrapping paper and give it your personal touch.  You can get as elaborate as you like by carving designs into potatoes or make snowman images with round stamp shapes and add features with markers or dots of paint.  For Super Saturday art making at the gallery we kept it simple.  


Using a brush, we applied paint with to the cut fruit or veg and stamped a few times before reapplying the paint and stamping some more.


Some made patterns


Others did all over designs


And then there's four year old Caitlyn! An artist after my own heart.  
She always dives right in without fear.


Tuesday, November 3, 2015

Full Body Tracings

What could be more fun than your very own doppelgänger? 


I keep coming back to this project because it is such a rewarding experience.  Everyone enjoys a collective energy in making, and there is sheer delight with the outcome.  I could do this every day!   

This activity starts off identifying with the self in a physical way, copying the image you know as you, but quickly turns into a reflection of personality and character.

All you need is big paper, pencils, glue sticks and tissue paper.  Tissue paper comes in so many colours making every clothing option and hair colour possible.  Plus it adds a great texture to the work.


Simply lay down on the paper and pose how you like while someone traces around your body with a pencil - careful it can be a bit ticklish.  

Use a glue stick to apply glue to one area at a time. Cut or tear tissue paper and stick it down on top of the glue and move on to the next area. 

Don't worry about gluing inside the lines, any excess tissue will be cut away when the figure is cut out afterwards.


The floor is the best work space for this.


There were those who chose to creatively colour their person.


Some wonderful characters emerged!!


Monday, October 26, 2015

Pinch Pot Pumpkins!!!


I love fall and I love pumpkins.  Used to celebrate fall and harvest as well as Halloween this time of year is about pumpkin everything from decorations to pies to lattes.  A feast for the eyes as well as the palette!

This project is an easy introduction to clay.  Pinching a pot is a very basic shaping method used in clay building.  I used paper clay which becomes fairly hard when air dried.  


First, form a ball (for this project about the size of a tennis ball).


Next, push your thumb into the middle of the ball to create an opening.  


With your thumb inside the ball and your fingers on the outside, press them together.  Rotate the ball as you press in a repetitive motion.


Keep doing this as your opening becomes larger and the walls of the ball become thinner.  
For a pumpkin shape try to pinch in towards the centre of the ball at the top to keep the shape nice and round and the opening smaller than the middle.  


For the lid its simply a matter of pressing a smaller ball flat and shaping it again with pinching, or pressing it onto the table until it is the size you want.  


To add a stem roll a small bit of clay into a desired coil, add a little water and press it onto the lid.  


Take a pin tool or other carving tool and lightly draw a face and then cut it out.  This is when the pumpkin character comes out!

Add little bugs or leaves and vines or any other thing that you like.


Some of the fabulous creations from my Super Saturday group!!


These can be painted with acrylics once they are dry and are great with a tea light inside (keep the lid off if using a tea light) or a battery operated mini light.